how to add 4..16 extra tachometers to your computer
Motherboard Monitor by Alexander van Kaam is a great freeware that uses hardware monitoring chips found on most Pentium and all newer motherboards. MBM will detect and use the circuit described below.
Some motherboards have 4 monitored fan connectors ,others have only 2. They all have one thing in common: the SMBus.
Want to add 4, 8, 12 or 16 more fan sensors ?
One of my computers is a fulltower with 14 harddrives, 12port hardware RAID controller , SCSI adapter and is cooled by 5 fans in the cabinet + one on CPU , plus 2 in PSU and 2 in drive cage.
So I needed to to monitor more fans.
I choose the MAX6651 16 pin QSOP IC. (datasheet)
You can get one at http://www.maxim-ic.com/
MAX6651 offers 4 fan monitors (tachometer), and five programmable I/O ports.and voltage control that could be used to control fan speed.
Schematic:
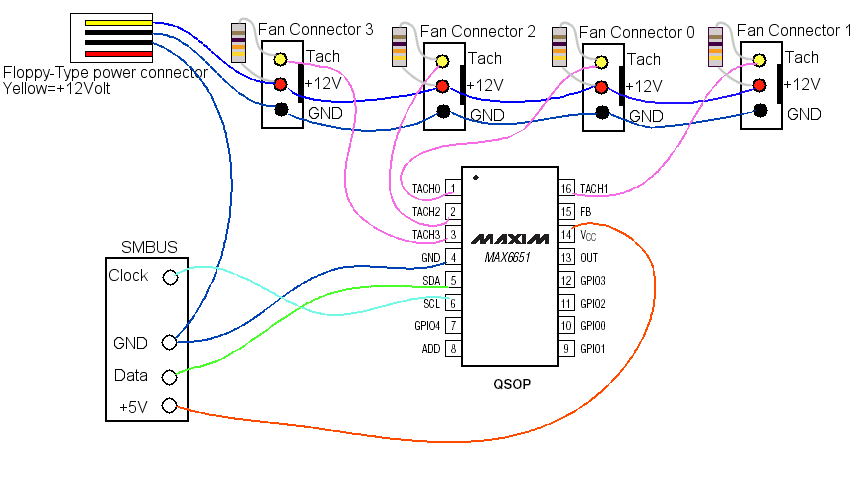
Resistors = 10K
Please add a 10nF capacitor between GND and VCC near the chip.
ADD is the pin that sets the IC’s SMBUS address, there can be up to four MAX6651’s on the same bus and the address is set by:
-ADD Connected to GND
-ADD Connected to VCC (+5V)
-ADD Not Connected (floating)
-ADD Connected to GND using a 10K resistor.
SMBus Connector:
Motherboards SMBus connector is 5-pin and is configured like this:
1-CLOCK
2-(not used)
3-GND
4-DATA
5-+5Volt
Most decent motherboards have such connector, if you cannot find it, or your motherboard do not have it, thengo to my “locating SMBUS” page for instructions.
Some additional info from the author of MBM:
The MAX6651 is a sensor chip only for fan readout, this sensor chip is not automatically detected by MBM because it has no device ID and it can be located on an address which a normal sensor chip uses, so if I where to auto-detect it many users would suddenly get this sensor chip in their fan list while they don’t even have it
Edit the MBM 5.ini file and find the [ADVANCED] section, add the line MAX6651=1 this will make MBM scan for it.
Please understand that the fan divider on this sensor chip counts for ALL fans and thus should be set the same for all the MAX6651’s of 1 chip found. The last one MBM sets when starting up is the one that will overrule all others
example:
Fan 1 : MAX6651-1-1 : divider 2
Fan 2 : MAX6651-1-1 : divider 4
Fan 2 : MAX6651-1-1 : divider 8
Fan 4 : MAX6651-1-1 : divider 4
for all fans MBM will set the divider to 4 since Fan 4 has it at 4.
The challenge….
…Is to connect the small QSOP package MAX6651 comes in.
You should be happy MAX6651 is so small , with that little mass it picks up temperature changes really quick (local sensor in huge packages is always sluggish)
So all you have to do , is connect those pins , each pin is 0.25mm wide, and there is one pin each 0.6 mm.
That is : “on less than 5mm there is 8 pins to solder”.
You need a soldering iron with a small tip.
SMBus uses only weak (20mA) open collector outputs. It’s not possible to destroy I2C or SMBus by short Data and/or Clock to GND or VCC or to each other.
The easy way….
You can order a prototype QSOP PCB http://smt-adapter.com/ (*) that have large terminals and are easy to work with .
*Thanks goes to Brian Macomber for providing the link.
Some Pictures….
just a test computer – observe the “Fan 4…..Fan 7”

The black 4-pin connector is the “floppy power” connector – it’s there to provide power (+12volt) to the fans.
The double green connector is the SMBUS connector that goes to the motherboard – there are two of them (above each other) to allow chaining of more SMBUS devices , like even more fan sensors or temperature sensors.
FAQ:
Q: how can I make a fanbus that is able to control the fan speed/(voltage) ?
A: The MAX6651 have several outputs, but only one is “almost” suitable for controlling speed. To be able to smoothly control the voltage to each fan, a simple D/A output is not enough.
Additional Info/thnx:
Per Ullman – shows you here how he build this project by connecting to the RAM DIMM sockets, rather than soldering on the DIMM’S.
Thanks to:
Alexander van Kaam – not only for MBM, but also for quick help and additional info.