Simple desoldering of the Solo Battery Connector

Users of BMSOne can find it hard to remove the special Solo battery connector from a dead battery, this is a guide on how to do it, with a focus on simplicity.

No desoldering vacuum station, preheater, or reflow oven required. 🙂
Or: you can just buy it here (somebody else is selling, I am just providing the link for your convenience I am not paid to do so)

Safety First :

People are afraid of the dreaded thermal runaway, where the Lithium-Polymer/ion battery spew gasses & fire when shorted/damaged.

Basic physics tells us that the energy to do that, must be available, or else, there will not be smoke/fire hence:

Drain the battery – method 1:


Connecting a small 12v ,5-10W bulb to a bad battery (no reason to open it like I did in the photo below)

DO NOT think a 50W bulb will drain it better, it will make the voltage drop faster(and battery will switch off) – in the end , slower discharge is better.

In this case, I stuck the wires into the +/- connector. Switched on the battery, and let it sit on a concrete floor until it dies.

Drain the battery – method 2:

You may as well hover the Solo till it can’t fly no more, then let it be on until the battery dies completely

The BMS will fail to keep the FET’s on at somewhere around 5.7v or so, When the pack voltage falls that low, it will switch off, .. feel free to let it recover for a while then switch it on again..

When the battery is empty:

Solo Battery tool tells me that this battery is drained, no cell is even near 3.0v even an hour after it switched off
I have seen the voltage drop far enough to it to switch off more than once.
A properly drained battery, where all cells are low, do not have the energy to cause any fireworks, let me prove it to you.:

Opening the battery shell:

(will describe the process later – many have already done it.. if YOU did a video on it, feel free to let me embed it here.)

Extracting the connector:

I used an electronic hotplate, set to 300°C
You can use a cooking plate just fine.
The plate should not be red hot, let the PCB sit there for a few minutes, then start pushing the PCB down (so that the pins get a better thermal connection, and get pushed thru in the end.)


FLIR One: USB-C and battery mod.

FLIR ONE is a nice product, with an extremely limiting battery and bad software. (Luckily, third-party software is much better)

You may say the battery has two reasons to be there:
1: Limit useful time: pushing users to a more expensive product.
2: Obsolescence by design: become useless as the battery age and stops working.

Goals:
1: remove the need for battery and charging.
2: replace the MicroUSB with USB-C

Special tools: You will need one security T5 (Torx5 with a hole in the middle)

The original USB connector extracted from FLIR One
Fast mapping of the connections between USB and mainboard.
1: By heating the MicroUSB up, I removed it from the retainer.
2:USB-C OTG to MicroUSB adapter will be the donor for USB-C
3: This 4-pin motherboard connector will be re-used.

Using a Dremel multi-tool, I expanded the slot it the black connector retainer and the main body.
Using adapter (2): after de-soldering its female MicroUSB – I glued the USB-C connector inside the black retainer using epoxy.

Please note: A reader of this article told me that I got the D+/D- swapped in this post.
If what you do does not work: swap D+/D- (it’s harmless to swap them, but only the correct way will work)

The new connector in place, wires soldered to the motherboard connector.
Mainboard in place, observe the orange wire providing power where needed.
No more battery.

Assemble, and throw away the battery.

USB-C in place.

There is no more need for charging or switching on the device. Also, it does not run out of juice after 5 minutes anymore 🙂

Solo/Ardupilot SMBUS BMS

Latest progress:

See https://madhacker.org/bmsone/ – the resulting product.

13 January 2020:

It’s working as expected. (The balancing connector header had 2mm pitch on PCB (my bad), therefore, this test version got a wire.)

All Calibration/setup/programming and firmware updates are done over the FTDI header.

Please do not think much about the poor flight time I got during early tests, the cells had a bit too high internal resistance and produced heat/dropped voltage too much. Better cells could be used.

11 January 2020:

Preliminary documentation for configuration over Serial port (serial port is used for configuration and firmware updates):
Example commands in bold.

SC3256,3231,3255,3263 // calibrate cell voltage in millivolts for 4 cells.
Users can also omit any cell to if one-by-one calibration is desired for some reason, like SC,,3300, – this may be useful if calibrating by a single, precise voltage standard source.

SI10220 //Calibrate current sensor in mA “SI10220” = 10.220A

SV11.3, 11.7, 12.6, 13.3, 14.3, 14.7, 14.8, 15.7, 16.0, 16.2, 16.3, 16.4, 16.6, 16.7, 16.8 //set 15-point voltage linearization table

SP0, 5, 10, 15, 25, 45, 55, 79, 84, 88, 91, 94, 96, 98, 100 //set 15-point percent linearization table

SF9000 //set design capacity in mAh , here: 9Ah

GV //get firmware version
SW //write valibration/linearization tables to flash

5 January 2020: designed some initial PCB’s – now with individual cell measuring and current sensing.

(I hope to start selling them as a product before March 2020)

15 December 2019:

Currently handled I2C requests (all that Solo is requesting:)

0x08 TEMPERATURE
0x10 FULL_CHARGE_CAPACITY
0x1C SERIAL_NUMBER
0x0F REMAINING CAPACITY
0x23 MANUFACTURER_DATA
0x28 CELL_VOLTAGE
0x2A CURRENT

This is an early version of a BMS for any 0-5v/cell chemistry 4-cell pack for ArduPilot.

Right now, it is more correct to call it an BMS emulator, than a BMS.
A final product would measure individual voltages and the actual current. I started this way because it does not require a custom PCB and a minimum of discrete components.

This early version does handle all the communications, and makes the autopilot set the actual capacity (9Ah), reports voltage, and calculated individual cell voltages.


It does also calculate and report remaining capacity by doing a 15-point linearization and then interpolating a “voltage_to_capacity_table”. This method is good enough once one knows the battery characteristics and fly at about the same current later.

Test Flight1:

I did not wait for the 4S3P Li-Ion pack to charge fully. (Samsung 3Ah 18650-30Q cells) The outdoor temperature was about -5°C, batteries. Flight time was 17 minutes. With GoPro4Black + the brushless 3DR Gopro gimbal. The battery pack was 677gram. Included in that weight is 22gram that is the BMS microcontroller PCB, Solo battery connector and wires/connectors to battery.

The predicted SoC percentage (blue) is clearly not perfect (yet) it was good at the end, not at the beginning, but that is not a problem, as it is easy to change by modifying the table.

Notice that it can still climb at as low as 10.5v , not exceeding 70% of throttle.

Post-flight thermal image: (somewhat affected by some kapton tape on the battery pack.)

TODO / Future:

Given enough interest, I plan to make a fully standalone BMS that can be user-customized to any chemistry, (min/max voltages) and so on.
With balancing, real current sensing, fuel gauge etc.

3DR Solo Battery diagnostic tool and charging adapter.

The blue thing in the photo is the shipping protection for the connector.

Image result for good news everyone

Related product:  https://madhacker.org/bmsone/

—–now back to what this page is all about:

This is the original Battery tool;

  • more information
  • more features
  • better understanding of the battery
  • firmware upgrades for all (and no incompatible versions)

Buy  boxed version ($35 +worldwide Shipping $4)

DO NOT ORDER (YET) IN STOCK, but can ship *after* vacation 1 August.

3DR Solo battery packs have lots of information that the average user will never see, they are also very nicely calibrated for voltage (cells and pack) as well as current.

Some of the information, like capacity, cell voltages, cycles, past low voltage condition, cell voltage difference, and manufacture date may be very useful.

Health data is very useful as well.

Below: two devices, one as delivered, the other with an XT60 connector for charging.

It’s easy to solder on XT60, charger cables, or other connectors right on the main connector. The XT60 is there just for illustration purposes, it’s easy to solder on most of the typical connectors (XT60, EC3) directly, the rest can be soldered on with wires.

“Hard” edition means it comes in a nice case designed by Purplemon on Thingiverse:https://www.thingiverse.com/thing:2841916

The device is not doing any calculations on it’s own, data is read from the battery, and presented.

Values and information details:

Pack Voltage
Charge level in %
Remaining capacity
Internal temperature.
Charging current. (Negative value indicate discharging current)

Cell voltages for cell 1…4 – should be self-explaining, any healthy pack will have very similar voltages after a flight.
Design capacity is what the pack was designed to be.
Actual capacity is shows the actual capacity as the pack ages.
Relative charge level is based on actual capacity of the pack.
Absolute charge level is based on design capacity of the pack.

Manufacturing date in Y-M-D format.
Made by BMTPOW
The device name is MA03, serial number follows (not the same as the barcode on the pack)
TTF: Time To Full, if not charging, will display “-1”
Cycles: how many times have this pack been used. This is increased when discharged_capacity_since_last_increase > design_capacity.

The status word is bitmapped at least two bits we know are used, one indicating charging/discharging, the other tell if the factory calibration data is OK.

Should factory calibration data ever be corrupted, then you can never know if a reported voltage/current (used for capacity calculation !) is correct, and it’s dangerous to fly with such a pack. A very clear warning will be displayed.

Firmware >=1.5  say “Initialized” when BMS is calibrated&configured properly, or “NOT” initialized” if not.

There is also a warning for internal resistance deviation.
There is a “Cell Change” warning, I do not know what can cause it, or what exactly it means – both warnings above are for illustration purposes, I have no packs with such condition.

Status is expected to be 128(charging) or 192(discharging)  , 16608 is a fully charged battery. (Thanks to Bob that found that).

Since firmware 1.5, status understanding is much better, and most data is presented as text.

Health is 18 for all good packs (I do not have one that is bad) , but there are 16bit of data that can indicate quite a lot…

I’ll update this page based on user reports.

Lowest voltage record.
– Displays eight last low voltage records, some values are initialized as 3.5v, but it is the lowest values that indicate if the battery has ever been close to deep-discharge.

If the battery pack is connected, but not charging – after 180seconds, the DONE message will show, two minutes later the battery will switch off.
(Shutdown feature is inhibited at any time by pressing battery button to toggle screen.)

Serial output:

This dataset is being outputted to FTDI interface at 115200baud, one at 1hz.
The device will not go to sleep once you used the battery button to select an screen.

This allows for nice graphing of charging/discharging, and full monitoring using DataExplorer with the plugin I’ve made: Solo_Batt_Tool

Of course, you are free to do whatever logging you wish, the format is basically semicolon delimited, and temperature, cell voltages are multiplied with 100/1000 so you don’t need to parse thru commas.

The data format is:

$1;state(int);time(ms);voltage;current;rel_cap;abs_cap;rem_cap;temp_c;c1;c2;c3;c4;ser1;ser2;ser3;ttf;cycles;checksum(LF)

example:

$1 ;1 ;20988; 1550; 0; 52; 52;2724;2445;3874;3874;3875;3876;105;26;76;-1;8;0

How-To:

Plug into battery , switch on battery.
or:
Plug into battery , and provide charging current.  You can use any standard charger, select Li-Po 4cell program with no balancing (the battery have internal balancing circuit)

Firmware upgrade:

There is an custom bootloader on the device, so when I figure out more about the battery, it’s possibly to upgrade it using a standard FTDI cable and the avrdude tool (for Linux,Mac,Windows).

FTDI cable, with an extra pin header.

Insert pin header into FTDI cable, the protruding, short pins will fit into the SoloBatt_OLED’s six pins on the edge of the PCB.   You will need to cut away or puncture a little bit of shrink-wrap to access the edge.

The upper & lower of the six pins on PCB are marked BLK (black) and GRN(green)  – make sure that matches the orientation of the FTDI cable. (reversing does no damage)

Observe that there are two files in the firmware package:

“VG” is for displays with pin order: “VCC, GND, SCL, SDA” 
“GV” is for displays with pin order: “GND, VCC, SCK, SDA”

To write the new firmware you will need the avrdude application.

On Linux, it’s installed by:  “sudo apt install avrdude”

The firmware upload command is:

avrdude -patmega328p -carduino -P /dev/ttyUSB0 -b115200 -D -Uflash:w:SoloBatt_OLED.1.1.hex :i

/dev/ttyUSB0 is most likely correct, the number will be higher if you have more than one USB serial device

If you are using windows, replace /dev/ttyUSBx with COMx  , also, in windows, you’ll need some FTDI drivers.

Please note that the programming protocol is Arduino compatible just enough to make it work with avrdude, but it’s not really Arduino.

Firmware 1.1

  • Longer auto-off delay (was 2min , now 4min)
  • Longer time per screen 3s->6s
  • Serial output using FTDI cable at 115200 baud

Firmware 1.2

  • Warning if the battery has detected uneven internal resistance.
  • Warning named “change cell” (not sure when that is supposed to kick in)
  • Low voltage records.
  • Three digits in cell voltages.
  • Fahrenheit & Celsius temperature.

Firmware 1.3

  • Serial logging for Dataexplorer plugin (and any other data collection).
  • Shorter splash screen timeout.
  • Cosmetic fix for long status numbers on OLED display.
  • manual page flip. lets user skip forward to a certain page, and stops automatic rotation.  (connect a momentary switch between pin8 and pin9 – or – if you are using a microcontroller , just pull pin9 low.)

Download: SoloBatt_OLED_v1.3

Firmware 1.4

  • Pressing the power button on the Solo battery jumps to next screen, pressing button loads next screen, and disables the default time-based change. (you can watch one as long you want).
  • Manual page change disables auto-off.
  • Displayed data is updated at 0.5Hz

Download: SoloBatt_OLED.1.4

Firmware 1.5

  • Found out more about battery status, and presenting it as text. , among others, you may see “Fully Charged”, “Fully Discharged”, “Charging”, “Discharging”, “Initialized” “NOT initialized”, “Term.Disch.Alarm” and “Terminate Charge”
  • The old status “Calibrated” is now replaced by “Initialized”   – which means not only that the voltage/current sensors are calibrated, but also that the BMS is configured for proper operating limits and parameters.  A “NOT initialized” battery means improperly set/default BMS configuration.

Download: SoloBatt_OLED.1.5

Firmware 1.6

  • Moved the splash screen to back, now you see voltage & SoC om the first screen, no unnecessary delay.
  • Faster startup.
  • More (odd) errors are reported as text,  most error codes & bits are known. 
  • Cosmetic fixes. 

Firmware 1.7

  • Cosmetic fixes
  • No shutdown while current >0.1A

Sony QX1 Focus/Trigger control and feedback for drone use.

 RC, PWM control for QX1.

Buy QX1 modification service ($150)

Buy a QX1 battery eliminator 4.75V-23V

Sony ILCE-QX1 has great specifications at low weight, which makes it good for UAV photogrammetry use.  It can be configured using WiFi , then retain the configuration. (so it’s not necessary to even enable wifi for each operation.

About the modification:

The pop-up flash assembly is removed, an microcontroller replaces the flash assembly, it’s interfacing the motherboard indirectly, via FPC. The flash cover is slightly cut to make space for the servo (PWM input)   and logic level output that indicates shutter operation.

Can reliably do manual-focus shoot every 700ms. (no drops)

The camera will continue to function normally as before when the PWM interface is not supplied with power, except for the flash.

The modification requires micro-soldering; most narrow are three points within 1mm distance. Naturally, it voids camera warranty. (so test camera well before getting it modified.)

Features of the modification:

  • Camera will not shut down when inactive..
  • 3-wire servo connector (PWM input)
  • 1-wire logic output (high on shutter) -allows precise GPS positioning of each photo, and confirmation to the AP that photo is taken.
  • Command “Shoot” (just trigger a photo, for preset/manual focus)
  • Command “autofocus for 500ms, then shoot”
  • Command “autofocus for 1s, then shoot”

Suggested ArduPilot setup:

CAM_DURATION = 1
CAM_FEEDBACK_PIN (set to correct input)
CAM_FEEDBACK_POL = 1
CAM_MIN_INTERVAL = 300
CAM_SERVO_ON = 1200
CAM_SERVO_OFF = 1500
CAM_TRIGG_TYPE = 0

PWM Commands:

990us … 1400us = Shoot instantly (manual focus)
1401us … 1600us = Idle
1601us … 1800us = autofocus 0.5s , shoot
1801us … 2200us =autofocus 1s , shoot

I can convert your camera, but I am unable to provide QX1 cameras from Norway.

Contact for more information.

PWM>FLIR: Control FLIR TAU, TAU2, Quark using PWM (RC Radio)


A quick demo, switching between 8 modes using a servo-tester. The TAU640 in this video is set for outdoor use, and does not show the full advantage of Ice&Fire modes inside.


What you get:

  • A microcontroller on a small PCB (18x33x3mm) with soldering pads. Preprogrammed with 8 different modes as in this video, or up to 10 custom modes (as ordered).
  • The circuit works on 5v, uses less than 10mA.  You can connect it using 3 wires,  just like a servo)
  • The modes are selected using a knob on your transmitter, PWM decide mode, just like a servo position.
  • Serial data, is sent from the device to your FLIR device using one wire – (assuming you have common ground)
  • The common modes in this test video shows 8 modes I’ve found very useful.

What you need:

  • FLIR TAU ,TAU2, or QUARK thermal core.
  • For TAU,  “Wearsaver” helps a lot.  – It offers big soldering pads for connecting to the Hirose 50p connector. RX(pin2)
  • For Quark , you need to connect the serial signal to pin 15 of the Samtec 60 pin – connector. or to the breakout board, if you that.

Connection instructions:

Connect PWM (white wire) from your receiver to pad9 on PWM>FLIR device
Connect “-” (black wire) from your receiver to GND on the PWM>FLIR device
Connect “+” (red wire) from your receiver to VCC on the PWM>FLIR device

Connect pad8 on the device to your RX pad on wear saver, thats solder pad with green ring in the picture below.
Connect ground and +5v to TAU (black and red pads in picture below)

Finally, for information only:composite video out is on the yellow pad, and video ground on the blue pad on the TAU wearsaver.

TAU Wearsaver connection

Default mode configuration is:

1, white hot, no zoom , spatial threshold gain 34d.
2 white hot, 2x zoom, spatial threshold gain 34d.
3 Black Hot, no zoom , spatial threshold gain 34d.
4 Black Hot, 2x zoom, Spatial threshold = 9d
5 Fusion,no zoom, spatial threshold gain 34d.
6 ICE & Fire, no zoom, spatial threshold gain 34d.
7 Rainbow, no zoom, Spatial threshold, Gain = 34d
8 ICE & Fire, no zoom , Spatial threshold 17d

You can output a PWM from an autopilot, controlled by GCS, having any GUI you prefer.  – Or , if  you are will be controlling the PWM directly from a RC radio, you  do not need a rotary knob with steps, it’s perfectly easy to hit desired mode even with smooth knob due to the quick visual change, and equal “distance” between modes.

Buy PWM>FLIR interface ($160)

(Cart will appear below)

CryptoTelemetry – Secure firmware to prevent drone hijacking.

The CryptoTelemetry firmware:

Due to the proven vulnerability of current telemetry modules, I’ve developed something significantly stronger.

The source is not open, because it’s not real strong, certificate-based encryption, that allows end-user to replace, create new certificates. One advantage of doing it this way, is that you can purchase more radios and add them without having to reprogram all.

The secrets are permanently stored inside, and opening the source would give glues of possible attack vectors.  I intended this to be a long time viable, secure solution.

Still – the owner have the option to get more radios that will work with his private network.

Features:

  • 433,470,863,915Mhz support.
  • Fully compatible with all ground station configuration tools.  All the common AT commands and parameters are there, there’s even a NetID that will let you make different networks within your encrypted network – should you wish.  Example, if you have 4 CryptoTelemetry radios,  you can have 3 in different UAV’s , all have the same network ID, and will speak to the same GCS, typical use is “one at a time”. Or you can set two radios with NetID different than the others, and use two GCS and two UAV simultaneously. – Note that no non-CryptoTelemetry radios will be able to communicate with these radios.
  • Locked down firmware, even if one malicious customer purchased it for analysis, it would be hard to learn anything from it.  – Then it would take some time to find your encryption key.
  • Personal encryption key.  (most tend to be 11digits) Only the customer will have the key, it is NOT stored here. To order more radios for the same network, it’s essential to provide the key so a properly encrypted firmware for your radio can be generated.
  • Your radios will operate in your network, no one else will be able to see the data, or encrypt without some extensive cryptanalysis and hacking.
  • Encryption can be disabled by disabling ECC – radios enter then a transparent mode, which is 2x the usual ECC data rate.
  • Efficient; the data rate is the the same as ECC,  (half of the non-ECC speed.)
  • ECC (Golay24) is still active, for every 12bit , up to 3 bit errors can be corrected.
  • Delivered on standard, authentic, genuine 3DR telemetry radios.
  • If customer provides radios, it can be flashed onto a several other/compatible radios.
  • Reversible – should this method be obsolete one day, it is fully possible to convert these radios to run official 3DR provided firmware.

I am using this firmware for all my commercial operations as well as hobby flights, it is well tested.

Get your radio reprogrammed with CryptoTelemetry ($85):

Buy new original 3DR Radio with CryptoTelemetry ($135):


How to hijack a drone by telemetry – and prevent it.

My professional background is network and Internet security, I quickly discovered the huge risk of an hostile takeover of UAV midair.

My experiment is based on 3DRobotics telemetry radios. but works with many more radios, based on the same, open, solution.

Please note that this is not a security risk of Ardupilot project, ArduCopter, ArduPlane is *not* to blame.  You may get an idea that some changes should not be allowed while armed, but that’s not a proper solution. Having all the options we have, after all, GCS is a device to be trusted, and the primary control during a auto mission.

Radios lack proper security, mostly due to limited processing power for proper encryption.  We are left with an simple attempt to secure the data, which is very easily worked around.

The open nature of the project, makes it impossible to truly protect the transmitted data. The radios do not have space & processing power to use  public&private  certificate based verification of data, also we would need a simple and a method of letting users selv-sign/generate such certificates for as many radios they needed in a network.

The current attempt to secure the transmission is based on radios dropping packets branded with different NetID- and the frequency hopping pattern to be seeded by the NetID.

So knowing or guessing one UAV’s (or companies) NetID, (provided it’s even changed from the default one) , enables anyone to send packets that are perfectly valid on the network.

To verify the theory, I needed an experiment:

I created a specialy crafted firmware for the stock  telemetry radio, it proved to be a trivial task, Let’s call the module for BlackSheep, it have the following features:

  • Automatic sniffing of nearby NetID (as we know, the user-set NetID is also used to seed the frequency hopping)
  • When it finds valid packet with NetID, it learns active frequencies, and changes it’s frequency hopping to the pattern of that particular NetID – locking in on it. – whole process takes ~1second.
  • By connecting BlackSheep to any GCS, we have instantly a valid connection to a nearby operating UAV.

Hijacking the drone in real life.

We can assume a low-tech drone hijacker would do it by running a GCS and just do it manually. An intermediate hacker would use scripts with MavProxy, or clicking around in GCS software – but the optimal solution, is a predefined set of commands used by a modified GCS for easy map interaction.:

This is what an takeover looks like;

  • pointlessly evil hijacker could just disarm the drone midair or send MAV_CMD_DO_FLIGHTTERMINATION – but that’s not the goal here.
  • send, and repeat a few times: SR?_* = 0  – disables all telemetry output from AP , make the radio go silent.  This will also reduce amount of packet collisions if we have 3 radios operating. (UAV is the one occupying most of the radio time) – now the victim GCS operator does not  get any more updates.
  • Then we set all control FLIGHTMODE_? to AUTO or Guided (by preference),  and disable FS_Throttle and FS_GCS , CH6 and other programmable options are disabled. The pilot with RC can’t do anything anymore.
  • Enabling SR?_EXT_STAT – gives the hijacker RAW GPS data, altitude, speed – this data is usually not visible on a GCS, so the victim can’t see it – but hijacker knows where the UAV is.
  • Uploading a mission, or Guided mode instructions sends the UAV to wherever hijacker wants – victim have no valid input, and cannot see it in GCS, all he gets is Mavlink heartbeat.
  • Finally, for the extra evil touch hijacker can inject Mavlink MAVLINK_MSG_ID_GLOBAL_POSITION_INT packets (as if autopilot was sending it) with proportionally incorrect data, so we could get the victims GCS display and log the real movement, with actual speed, but in different direction, misguiding as to where the UAV went.

I skipped a few trivial steps, like setting higher cruise-speed, and few platform dependent commands – but the short summary should be frightening enough.

What can be done to prevent such hijacking ?

  • Fly without telemetry radio, reducing mission control and control redundancy, not good.
  • Use cellular network to get TCP or UDP control, limited coverage.
  • Use wifi, very poor range.
  • Satellite modem, expensive, very low data rate, often ~2400bps
  • Continue to develop open solutions with hardware limitations that limits us to very simple security solutions, like the one in use today – very easy to circumvent.
  • Use customized, specialized, closed solution that offers good security, it is not proper certificate based encryption, but rather an odd, but very effective scrambling.  Effective mostly because the firmware is locked down, and not easy to analyze.

Final words:

Telemetry radios , 433/900Mhz are great, most aviation authority approved approved flights , professional or hobby, are within VLOS, where these radios perform great.

The fact the source i open, is not a drawback, but a strength.  It allows people like me to detect security vulnerabilities, like many other can do, and documents them, or protect against them, so others cannot silently abuse them, without users understanding what’s going on.

XBOX S-Video + SPDIF mod

This mod gives S-Video output, and SPDIF (digital audio) output, plus removes the need for the original audio+video cable

Why:  XBOX usually delivers Composite Video output + Stereo output.   With an “Advanced” cable, user can enjoy RGB video & optical SPDIF.
I wanted higher video quality then composite video delivers, and my projector (as most projectors) does not support RGB.S-Video is better then Composite, mostly because it uses 2 wires (Luminance & Chrominance) , instead of  just using one wire, as Composite does.

This mod allows XBOX to boot & work just fine without the original audio+video-cable connected.

The original cable is still working after modding this way.

This should not be necessary to say, :  This voids your XBOX warranty instantly 🙂

+The original connector/cable will still work as before.

I skip schematics – here goes the pictures…  they say it all:

Finding the signals/connecting to them:

This picture shows the solder-side of the XBOX motherboard, where the video+audio connector is mounted.
RED long wire,  goes to the center of the SPDIF connector.
WHITE wire, is the S-VIDEO Luminance line
GREEN wire, is the S-VIDEO Chrominance line
The thin RED wire that connects three solder-points , connects two sensing-points to GND, When this two points are grounded – XBOX is cheated to believing that the original cable is connected, AND  SPDIF digital audio output is enabled

TRICK:  Usually – I would also need to connect the Y-GND & C-GND lines too.  XBOX is fortunately well build and uses common ground for all I/O lines, and therefore, I will use the ground from the XBOX  chassis instead..

Now , The connectors:

This is the inside of XBOX’s rear shielding plate.,

I drilled some holes, and inserted:
One female RCA connector for the SPDIF
One female S-VIDEO connector
Both connector’s shields are soldered to the XBOX’s chassis-shield (perfect ground source, XBOX motherboard is very well grounded at several points)

Finally , Connecting the connectors:

*1  =  S-Video connector.   There are two more pins beneath the two you see.  These pins are connected to ground.
*2  =  SPDIF, ground connected by soldering shield to the XBOX shield

HINT: You can see I removed the tin-fan-grills that  were between the fan and the plastic fan-grills.  I did it to improve air-flow.


A better alternative :

Using shielded cables might give higher quality – I did not see any difference, but here’s some pictures of this mod with shielded cables…

PainmakerLCD 2

Worlds most advanced paintball marker controller. (back in’97)

New electronics for Brass Eagle’s Rainmaker

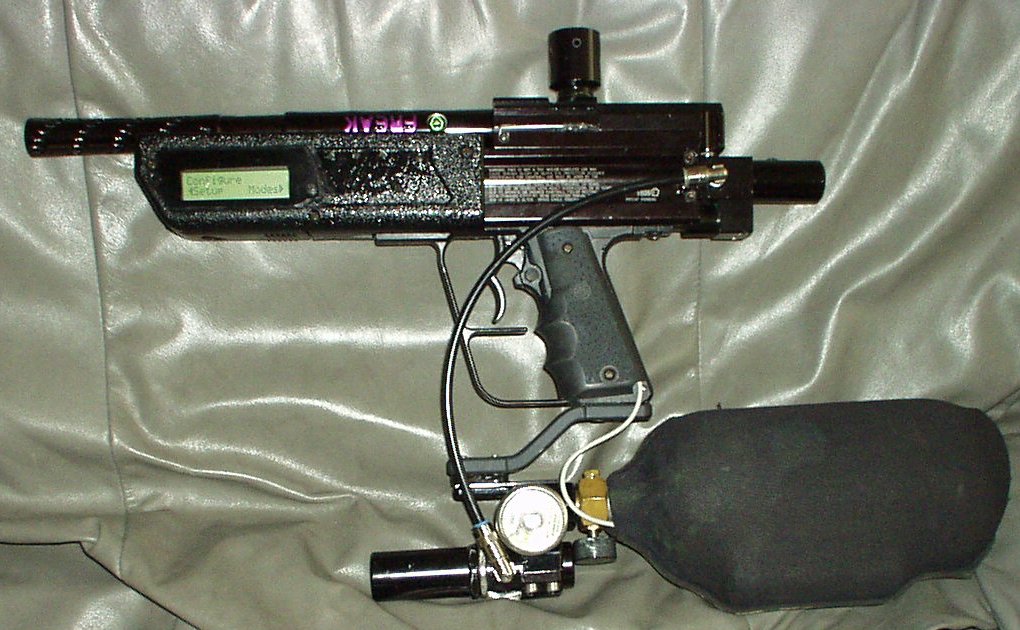
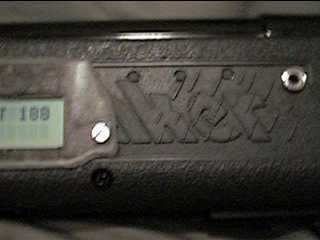
-who says the standard Rainmaker must be ugly-grey  – here it is in  black(picture taken with flash)

(I do not sell them anymore – sorry)

This is what you get :
-PainmakerLCD board
-Better trigger switch , (much tighter)
-The optocoupler if you want to use the  Revolution-Starter option
-Schematics you might need.
-Shipping to anywhere on Earth

Those were sold for US$ 230.


Some facts :

  • – all electronics are inside the fore-grip , on two dual-sided PCB’s with a “bus” in-between
  • – CPU is a  20Mhz RISC processor , with 8KB Flash EEPROM  .
  • – The Source code (ver 1.0) were 3328 lines of pure assembly. (takes 48 A4 pages when printed)
  • – All settings / preferences are saved in EEPROM ,… no battery is needed to keep settings.
  • – All menus / functions are controlled by only three buttons .
  • – Electronic Safety is on when in any configuration menu. or reloading (loader lid open)
  • – It’s powered by one 9V Ni-Mh battery inside the grip , but can also take 12Volts or more.
  • – It have both a high-intensity LED and high-frequency beep (hard to localize the sound , HF sound does not travel as far as lower freq. do) , beeping  is  used for warnings/alarms/ button-confirmation + +


Features & Menus:

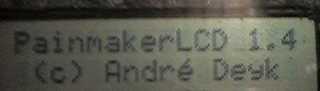
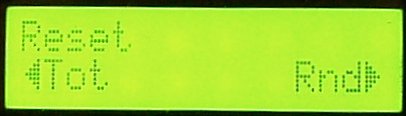
It all starts with Intro …


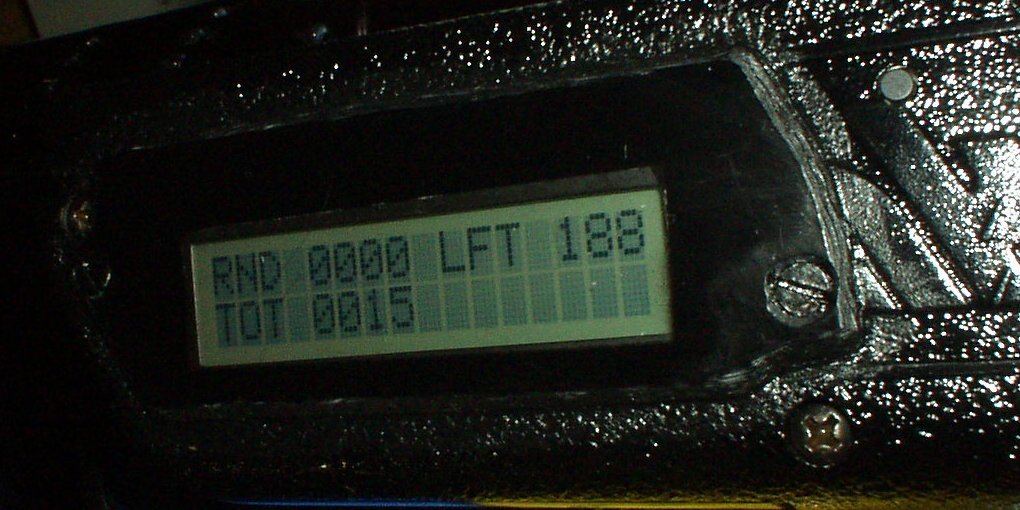
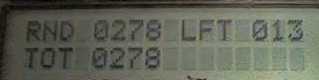
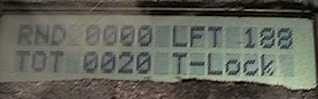
(Ready For Action: Totally fired 0015 , this round 0000 , LFT(left in loader 188 balls))

(This is the playing screen)

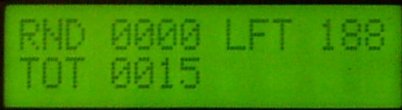
This is how the LCD looks like during a game. There are two independent counters that can be reset when you like , and can be saved to EEPROM and loaded at next game.


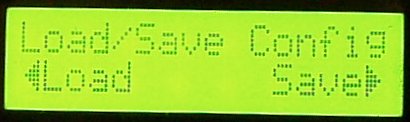
Load/Save Configuration , Painmaker LCD loads all previously saved settings at each boot, if you then make any changes they will not be saved until you save them , on the other hand , you can make some changes you are not happy with , and just load the previous  (takes only two button-presses to do that.)


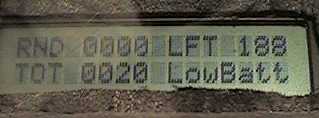
(After 278 balls are fired the last round (since last RND reset), totally 278 this “day” (since last TOT reset) , and there is 13 left in loader) so the LED is lit as a warning (because warning is on (in this case) if there are <=25balls left)

(This is the playing screen)

This is ho

w the LCD looks like during a game


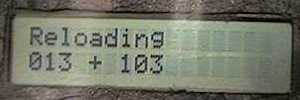
The loader detected that the loader lid is open ,(reloading) the display is showing this , until the loader is closed , safety is on.  , the LED is turned off.


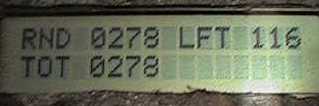
Loader is closed , the result of the above calculation (balls left + balls in a pouch) is 116.  (This is the playing screen)


Reset menu : allows to reset total counter , and/or round counter  “-” is left button “+” is right button


Menu : Battery – Shows battery voltage ,+/- 0.01 volt ,( it’s calibrated with a Fluke.)

this is updated so fast ,  that voltage changes are “animated” on the LCD (when 46 changes to 45 both “6” and “5” are showing because the 10bit DAC cannot decide the LSB        very cool.


Low Battery Warning Menu : … user can decide when the low-battery warning (audio) should be activated, (the minimum working voltage is different for Ni-Mh , Ni-Cd & Alkaline batteries.   (+/- buttons increase/decrease this value , holding down “+” increases value fast , holding down “-” decreases value fast)

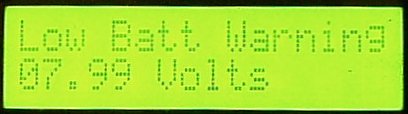
a “beep” sounds every idle 2 sec if voltage is low


If the battery is low , It’s also on the main screen…


Temperature :  a precalibrated to 0.5° C state-of-the-art IC is measuring the temperature , and sending the results serially to the CPU  ,     It’s not like the “AngelLCD” thermometer        , but a really professional (industrial) thermometer , calibrated to +/- 0,5°C .      If you live in Norway (like me) and play when it’s about 10°C     , it might be cool to know how cold it is , as the paint starts breaking really easy at that low temperatures . It might be useful at high temperatures too.

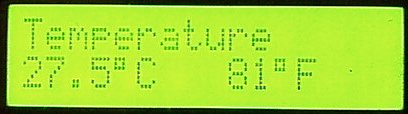
added Fahrenheit degrees , at first I wanted to calculate it , but it’s pretty difficult because of the decimals needed ,  , so I use a lookup-table , to save space the table have 60 entries , 1..60 °C  , so the Centigrade has higher resolution (0.5deg) and the Fahrenheit temperature is the same for 25°C and 25.5°C.


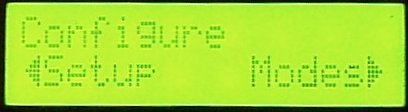
Configure menu is where settings like burst-size and loader capacity is set in “setup” part , and burst-on/off , fullauto and other are under “modes”  , go to left or right to continue setup from here.

Loader capacity presets the maximum Loader capacity … (+/- buttons increase/decrease this value)

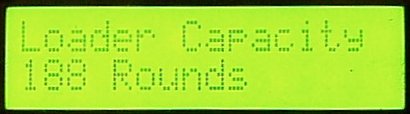
188 is the space in a Revolution + it’s neck.

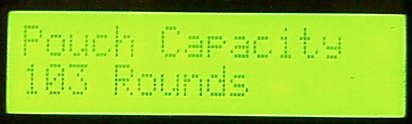
Pouch capacity must be known, (to add right amount of balls when loading) … (“+”/”-” buttons increase/decrease this value , holding down “+” increases value fast , holding down “-” decreases value fast)

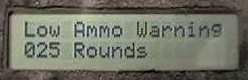
Here is the low ammo warning configuration , it’s now set to warn me when 25 balls are left (“+”/”-” buttons increase/decrease this value , holding down “+” increases fast , holding down “-” decreases fast)


Tournament-Lock    This menu will ONLY appear if the Tournament-Lock is ON  and then NONE of the menus below will show. Causing the last selected configuration being used without any way to change it during game.

This is THE BEST Tournament-Lock feature because :  It will let me not only lock-out the coolest features , (like any Tournament-Lock does)  , but It allows to keep any settings , and only restrict changes.    Like : I’m will play in a Scenario-Game (Command & Conquer) which allows any fire-mode up to 9bps , even fully automatic  . So I can choose any mode I like , and still restrict myself from being able too choose 13bps . by selecting Tournament-Lock when rebooting  ,  , and a battery-change does NOT affect the Lock’s state.

The only way to toggle this selection is to reboot , while holding all 3 menu-buttons (beeping) depressed in about 2 seconds (during the boot & intro sequence) which is  , needless to say , not possible during the game.  (playing with battery & beeping 2 seconds will catch referees attention.) m and the process would need to be undone at end of game.

the display also shows that Tournament-Lock is active during the game , (unless when that space is used to tell important things like Low-Battery) , anyway the first “Tournament Lock is On” can be reproduced.

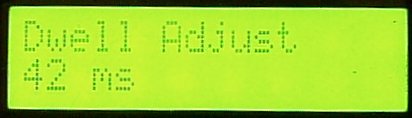
Dwell Adjust : 1…30 ms in 1ms steps .

  no rainmaker can shoot at speeds like 15bps ,because it will not have time enough to feed each ball , only the balls that quickly gets into place.   this is because of the low pressure controlled ram needs a minimum of time to cycle the mechanism . and at higher rate-of-fire there is very little time to feed next ball.    When this time is too long , time is wasted , precious time that could be used to feed ball… (any default configuration on any controller board  waste some time)   on the other hand ,      When this time is too short , The rainmaker will have a significant blowback , (because it’ll open the “chamber” when there is still very high pressure in the barrel) , of if this time is way-to-short , it will not fire at all , (the ram is reversed before it’s in hammer-release position)

So , this value should be set as low as possible , allowing normal function ,  this will extend the ball-loading-time.   This setting does NOT influence the rate-of-fire in any way, each ms set here is compensated for.

The optimal value of this setting will vary from rainmaker to rainmaker , because the time delay needed is dependent on : low-pressure-spring , ram , and hammer spring.

Also , having the optimal setting will save battery , the 9volt battery works pretty hard when it opens the MAC valve.  Because of the way PainmakerLCD is constructed it uses a higher voltage to control the Power-MOS-FET that opens the 6volt valve.  This gives a impressive raise-time and very “strict” MAC-valve movement.   , (anyway use Ni-Cd rechargeable battery)

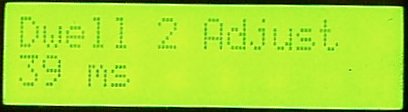
To make the adjustment easier to try out , There are 2 Dwell settings that can be programmed , and then toggled.


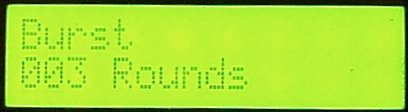
Configuration of  “burst” or “family” mode      (“+”/”-” buttons increase/decrease this value , holding down “+” increases fast , holding down “-” decreases fast)


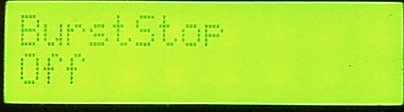
BurstStop = (On/Off) let’s user choose if a burst should be interrupted when trigger released , or not.


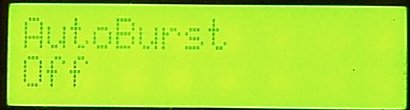
AutoBurst = (On/Off) , Similar to AutoRepeat , if on , burst repeats with a brief pause in between (until trigger released) , a three ball burst sounds like “bang-bang-bang….bang-bang-bang….bang-bang-bang….”


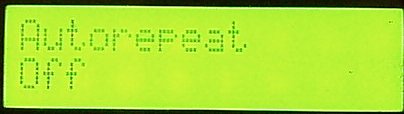
Autorepeat :  whatever the fire mode is (normal/burst/turbo) , when trigger is held down 250ms (0.25sec) , the Painmaker switches to fully automatic until trigger is released , good for bad situations   (and then returns to the mode it was in before) ,  (pressing “+” is “ON” , pressing “-” is “OFF”)


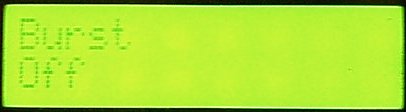
Burst: turns on/off the burst/family mode , which can be set to anything between 2 and 255 balls            (pressing “+” is “ON” , pressing “-” is “OFF”)


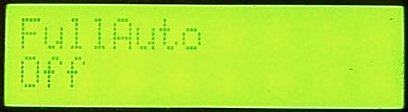
Fully-automatic : turns on/off the ammo-wasting mode.        (pressing “+” is “ON” , pressing “-” is “OFF”)

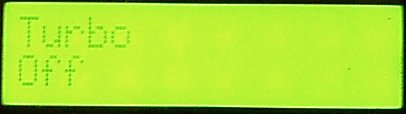
Turbo Mode menu : turns on/off the turbo mode.        (pressing “+” is “ON” , pressing “-” is “OFF”)


Fire rate , applies to all fire-modes and can be programmed to anything between 6.5 and 15** balls/s in 0.5rounds/s increments  (“+”/”-” buttons increase/decrease this value one step each click)) this setting limits the fire rate in ANY selected mode. It applies to all fire modes.

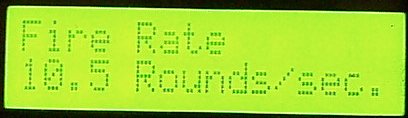
**There is no gravity-loader that will provide more than 13balls/second continuously (more than 4 shots), my tests gave me some “blanks” in between shots.  There are many things that will set the  maximum fire-rate you can achieve :  Loader, Dwell -(shorter is better) ,Low-Pressure system’s pressure (a little higher pressure will move bolt faster) , Bolt , (heavy bolt will move slower) +.

I made the selection go to 15bps in 0.5bps steps to allow everybody experiment and find your own maximum setting , my calculations (of recorded audio form Rainmaker) makes me believe that 15bps is possible with forced feed or a longer vertical feed , (if the balls are “falling”  faster into chamber there won’t be blanks) , 10 or 10.5 is the maximum of what my revolution loader can deliver continuously.


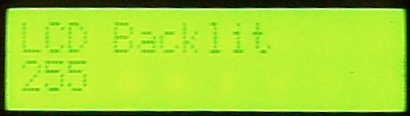
Backlit sets the intensity of the backlit when in menu mode , (backlit is always of in game mode) – 0 means off , 255 = max intensity


Those three menu-buttons (“+” ,  “Select” , “-“)      and the mini-jack connector to the Revolution-Loader


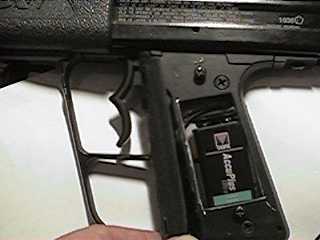
Battery is now inside the grip

… but a higher-capacity battery is recommended for trouble free , long play , go see the “PainmakerLCD Power”  page..


(Revolution-Loader mod.)

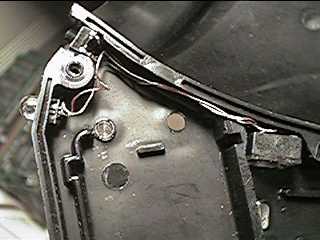
the button that detects when the lid is open , and the high-intensity-LED that’s used as a warning

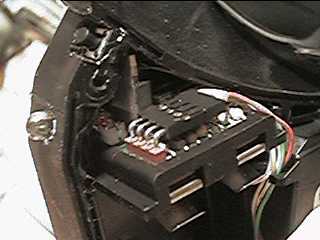
button & LED in place , and also the original Revolution-loader electronics.

closed revolution-loader , with the mini-jack connector

difficult to photograph , but it’s the high intensity almost LED blending the camera to tell the ammo is low


FAQ

  • Q: Is it an ADD-ON or what ?
  • A: It’s a complete replacement of ANY wires/electronics you might find inside your Rainmaker. or any compatible marker)


  • Q: Can you make it fit inside gripframe ?
  • A: ….technically yes , but not using the display I’ve programmed for (it’s too big) , I would also have to order some professional PCB’s made for  SMD (SurfaceMountedDevice) components. the size is as it is, because I did built it to be technically perfect , like : the PowerMOSFET controlling the valve is totally isolated from the CPU , using a optocoupler. , all this stuff takes some space u know.     , so…. It can fit inside , but will need a smaller display and a new PCB  , ….today , only the earlier project , the Painmaker (noLCD) can fit inside .. it has much common functionality , fire-modes/autorepeat  , on the other hand , a display inside grip us useless during play (may have little information and take some time too read)   , while when using this big LCD you can read it all very quickly by only turning the marker.


  • Q: Is it only for Rainmaker or will it fit any marker.?
  • A: It will work on ANY marker , the trigger input can handle both optical (semiconductor)) and mechanical-switch triggers , and the Valve/Solenoid output is very powerful , and can handle whatever load you need , the PowerMOSFET is driven by a higher voltage than it switches , it means the MOSFET is switching really FAST and powerful (very low internal resistance and low rise-time) NO other controller boards for any paintgun does this , as it requires a higher voltage than the CPU works at and thus a electrical isolation between PowerMOSFET and CPU  … The whole thing needs power supply between 7…24Volts.
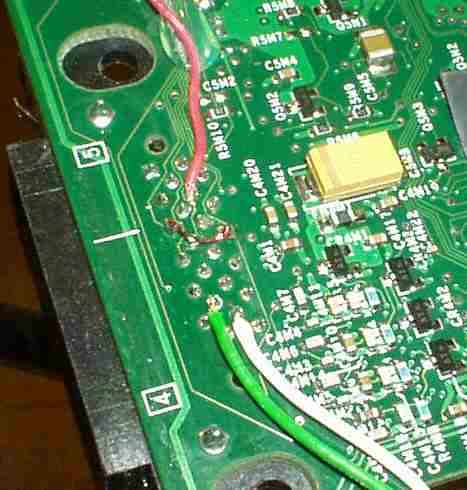