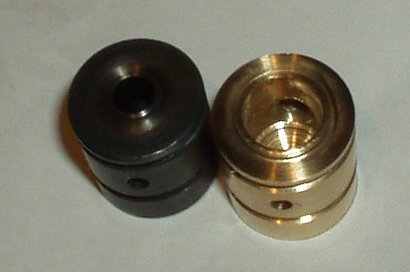
Most people agree that the original Rainmaker valve does not provide optimal flow , there are few aftermarket valves that should improve the flow , but none of them impressed me , so I made my own , with absolutely highest flow possible.
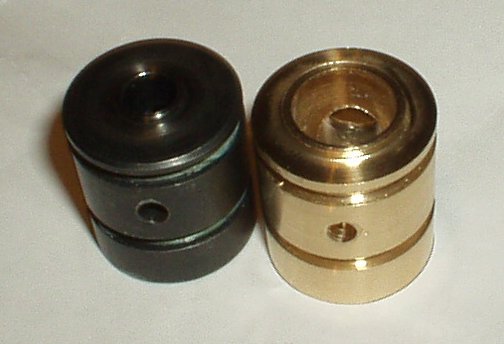
To the left , the original valve body , to the right , my version.
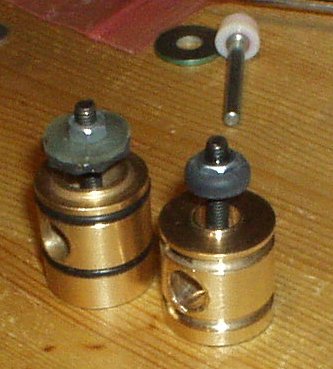
I made two different .,,,
Sorry , but I’m not selling these , too much work , …. unless I come across a cheap CNC machine 🙂
Worlds most advanced (back in ’97) paintball-marker controller board without LCD
This is a new microcontroller board with new features , including very useful “Autorepeat” for Brass Eagle’s Rainmaker
Buy it NOW :
This is what you get :
-Painmaker board
-Better trigger switch , (much tighter)
-The optocoupler you need if you want to use the Revolution-Starter option
-Schematics you might need.
-Shipping to anywhere on Earth
(no longer for sale, and out of stock).
Inside the grip….
The latest version ready for shipping , the two white wires goes to the valve…
The red LED (Light Emitting Diode) goes to the hole where the original circuit’s LED were.
Hardware used :
4Mhz RISC Processor , assembly programmed , (no high level mess inside) .
4Mhz resonator (for stable temperature independent frequency).
HEXFET (Power-MOS-FET) from International Rectifier controls valve.
Integrated 6 Volts regulator to use 9V battery (NiMh or NiCd rechargeable is nice) ,or any power source up to 30volts
(Painmaker can use the 18volt you already have in your Revolution / Evolution loader
Quad DIL-Switch to select configurations.
The Painmaker is polarity-protected, connecting battery wrong way does not destroy anything.
Features & Options :
Fullauto : No description needed , it blows out your paint really fast , at selected fireratio , mostly for people in stressed situations.
Burst : Fire preselected amount of balls each time trigger is pressed.
BurstStop : when enabled : a burst can be stopped by releasing trigger.
Turbo : The original “Turbo Mode”. , shoots when trigger is pressed AND released.
Semiautomatic : One ball at a time , lust like any tippman98 or stingray
Autorepeat : When trigger is held down more 200ms (0.2 sec.) after a shot been fired in any mode , the Painmaker switches to fully-automatic , until trigger is released , then it returns to it’s previous mode ……..good for bad situations
AutoBurst : just as Autorepeat , but repeats selected mode (burst/whatever) each 0.27sec.
Dwell Setting : Ability to program true dwell time (the time main-valve are open) , this time is compensated and does NOT influence the ROF (unlike other not-so-cool boards) do. Read “Dwell setting” explanation in FAQ:
ROF (Rate Of Fire) : Any ROF you choose , cannot be exceeded by any configuration , it limits all modes ,, you cannot shoot faster than this setting…
Tournament-Lock :If all 4 switches are OFF , : the programming mode cannot be entered when booting , Only semi-auto is enabled , and the ROF is set to right below 9bps , however , all user-setting are still “remembered” and the programmed Dwell is used , NPPL rules allow any Dwell setting.
Tournament-Ok : If the ROF is 9 or less balls/sec. AND the Fullauto/Burst + +features are switched off , (as NPPL tournament rules says) then the LED will flash quickly 3 times when power is turned on. , This way , referee’s can easily check that any settings you chose is following the rules….
Quick-Select : Three of those gold-plated-pins (are dedicated to Quick-Select , user can mount a 2-or 3 position-switch there , the pins are GND (Ground) Fullauto-IN and Burst-IN , Fullauto-In is connected to GND , the Fullauto kicks in , if Burst-IN goes to GND , the Burst is on. This allows user switch between semi , burst , and fullauto as any real gun nice for scenario-games. Of course Quick-Select are disabled when Tournament-Lock is on. Use if you want it , or just leave them unconnected.
Revolution-Starter : A digital output line , that starts “revolution” or “evolution” loader each time a ball is shot. User must mount one single component inside the Revolution-loader , and route 2 wires from Painmaker-board to the loader. very easy operation , well described in the “manual”…. the Painmaker is ready for this , the extra component is available for an additional 5 US$.
Programming mode :
Basic programming knowledge , : Programming is done using binary system , “0” means switch off , “1” means switch on , “x” means “don’t care” , you will see there are some “default” settings at each table , those are not really defaults , but rather “recommended” or “basic” settings , if you skip programming one table , the last value you set it to will be preserved , it will not be set to “default” …
( ! do not let all DIP-switches be “off” when connecting battery , this enables Tournament-Locked mode and you can’t enter programming mode , tournament Locked mode flashes the LED quickly 3 times when you connect power. , let at least one switch to be “on” in order to enter prog.mode)
Programming:
1.- When connecting battery , hold down trigger about one second ,then release trigger.
2.- The LED will blink ONE time , to tell you to use table 1:
table 1 (setting 1 (off,off,off,on) is default.
(those settings are OPTIONS , leave all “off” , and you have the semi mode…Any choice can be combined , if you want to turn on autorepeat and turbo , the switches will be “on-off-off-on”)
3.- Now , you are done setting the switches , the trigger have two functions in programming mode : to SKIP to next table (and keep the setting you had before , press trigger , to REPROGRAM this table (using current dip settings) , press and hold trigger about 0.4 second , then the LED will flash quickly 10 times to confirm. (release the trigger when it flashes) and then , you move to next step:
4.- The LED will blink TWO times , to tell you to use table 2
table 2 (off,off,off,off) is default.
5.- The LED will blink THREE times , to tell you to use table 3
table 3 (setting 3 is default)
6- When you selected the fire rate , using the same dip-switches as before , Press Trigger (as described in step 3).
7.- The LED will blink THREE times , to tell you to use table 4
table 4 (setting 13 is default)
8.- The dwell should be set to 40ms (on-on-off-on) which will give good functioning rainmaker , then decrease until you get a little blowback. when done , press trigger. (as described in step 3)…
9.- The LED will blink Four times , to tell you to use table 5
table 5 (setting 3 is default)
10.- Now you can configure the size of one burst , (used if burst mode enabled) ,, press trigger when done. , then you are ready to play.
Additional information : No settings are saved in EEPROM until table 4 is done , after that ,the new setting are in-use , and the board in back in “shooting”) mode – no reboot necessary.
All those settings are saved in EEPROM , and will not be lost for over 30 years after battery is disconnected.
FAQ:
Q: What do I get ?
A: A assembled Painmaker PCB with processor , battery-connector ,and trigger-switch basically everything you need , All you need to do is to connect two wires to the MAC-VALVE.
Q: Can the Revolution or Evolution loader-mod damage my loader or the voltage from loader damage my Painmaker) ?
A: No , the output to the loader and the loader itself is electrically isolated for 4000 volts. (that’s what the optocoupler does)
Q: Will the Revolution or Evolution loader work as usual when the Painmaker board is disconnected ?
A: Yes. The loader will work if it does not sense a ball OR when it gets a signal from Painmaker board.
Q: What is dwell setting and why would I like to mess with it ?
A: at a given fire rate , let’s say 10 bps , each cycle takes 100ms (milliseconds) , there are mainly two big “events” that need to be done during those 100ms , the shooting starts with closing the chamber , the ball is fired (valve opened), ….and the second part : the chamber is opened , to get another ball , so it’s ready for the next shot. ….. Now , by decreasing the dwell (the time the chamber is closed) you will increase the time the chamber is open , and that’s just what you want. The main reason that you cannot shoot continuously 16pbs is that there is no loader that would feed the balls fast enough , that would need to be forced feeding , not gravity based , so no revolution or evolution will be able to provide enough paint. By reducing dwell time to the shortest working time (before you get blowback) , you increase the time chamber is open , and increase the chances a ball have to be loaded , when balls do not have enough time ,(too high ROF, and too little time) you will fire blanks. and very louse paint may break (be chopped) remember 2 things : one.- Rainmaker does not normally chop half-loaded balls due to very cool construction , you can stop the bolt using a finger , not recommended with stingray , and two : decreasing dwell time to the point where blowback is significant , will NOT help the loading time. Remember the credit-card test.
REFEREES :
To check/verify if it’s tournament-locked , according to NPPL rules , : check that all 4 DIP-Switches are in OFF position at boot, if they are , then it is locked , put a tape over the hole to “seal them”
Locked mode can be verified even more easily : When battery is reconnected the Tournament-OK feature will quickly flash the LED 3 times if the Painmaker is locked .
As most other markers , if user is disabled from reaching the switches during game , (the grip rubber is screwed into place or there is tape over switch-hole) , it’s locked.
The Painmaker cannot change from locked mode without modifying the switches AND rebooting (resetting power by disconnecting it, and reconnecting after 1-2 seconds).
Trigger Modification :
The trigger mod have been planned since I started the Painmaker project. The Trigger Modification gives (measuring on the end of a 2 finger trigger) only 3mm movement between released trigger and “trigged” , this makes quick shooting more accurate and easy , the switch can be found at www.elfa.se it’s part # is :35-677-24 , datasheet . the switch life multiple millions of cycles.
 I made two different .,,,
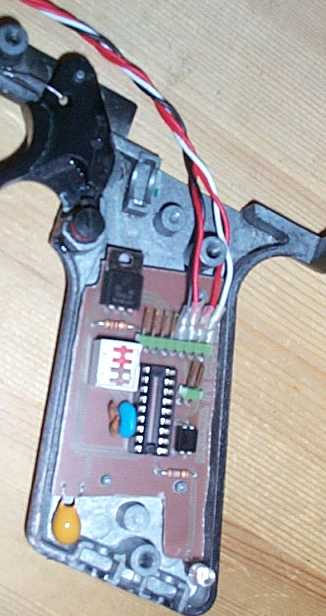
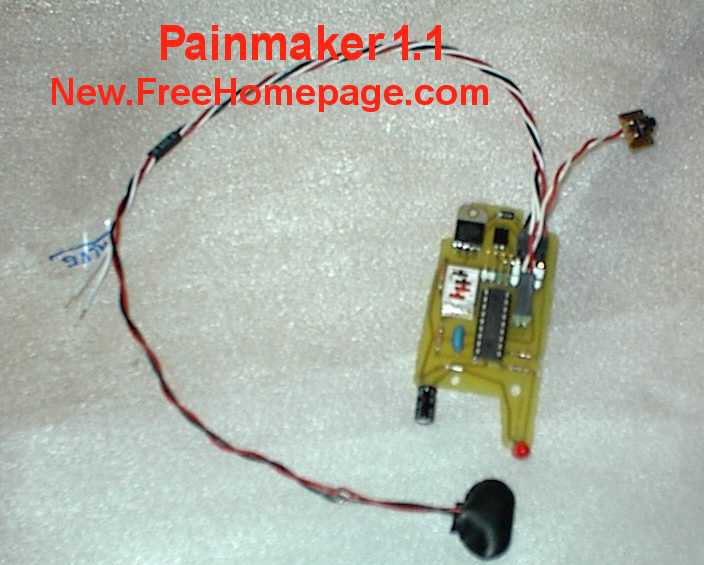

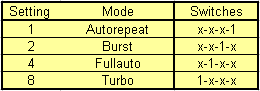
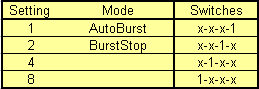 table 2 (off,off,off,off) is default.
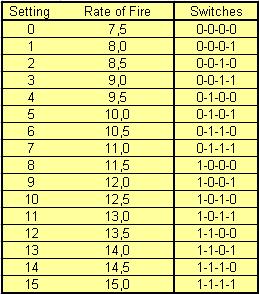 table 3 (setting 3 is default)
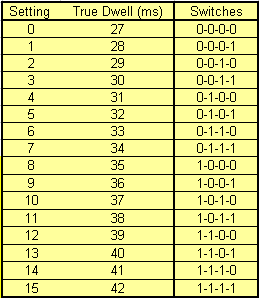 table 4 (setting 13 is default)
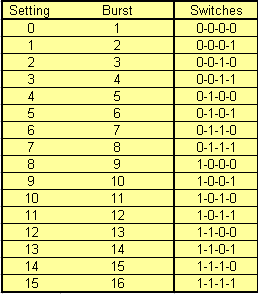 table 5 (setting 3 is default)